


Well it's about time, eh? I started talking about encoding two months ago and said I'd cover editing video and so here I am.
This part is not meant to be read alone. It's named part eight for a reason - you should have read the other seven parts before you start on this one.
Now before we start, you need to download one more thing - virtualdubmod or virtualdub (hereafter referred to as "vudub"). Some of you may already be familiar with it; it's a pretty decent avi encoder, but avi is so 2001 so we won't be doing any encoding in vdub. Instead, we will only be using it to see which frames to start and stop on. It'll make more sense as we go along.
Note: it does not matter which one you download. They are both virtually the same program, but vdubmod has more features.
So like usual, install vdub and open it. Next you will want to do everything in MeGUI up until part four. After MeGUI creates the avs file you will want to open the avs file in notepad. Your screen should look something like this (click for full size).

Now what you want to do is in MeGUI go to Tools and select AVS Cutter. This is MeGUI's way of editing audio. We won't be actually using this (because it does not play sound), but we do need one important thing from it.

Next, find the avs file that you want to edit and double click it. MeGUI will open it and your screen should look like this (I am using Momoko's Momochi DVD Zukan Image Video).

Leave "start frame" alone and just put a random number for "end frame" (it doesn't matter, we will change it later). Click "Add" and you should see it added above where you just typed.

Click "save cuts file" and name the file something nice. Click "okay" to the pop up that appears and then "close" on the AVS Cutter window. We're done with that for now.
MeGUI should have just created a new type of file - a .clt file. This is for the audio. Open the .clt fine in notepad, just like the avs file and your screen should now look something like this.

Okay, if you have two files - an avs file and a clt file and your screen looks like mine above, then you've done everything right.
Now what I want you to do is put all of that stuff in the background for a second. Go back to the folder with the .vob files, the .avs file, and the .clt file and stuff. Right click on the .avs file and select copy. And the right click in the folder and select paste. As you probably have guessed, this will create a copy of the avs file. Why? You'll see in a second.

Now open that newly made copy avs file in notepad. Of course, it will look exactly the same as the original avs file, so we're going to change some things. Delete everything EXCEPT for DGDecode_mpeg2source("D:\momochi iv\VTS_01_1.d2v")
If you are encoding from an iso then it will always say DGDecode_mpeg2source, but if you are encoding from an .avi file or .mp4 file or something, it might say "directshowsource". Either way, just look for the line that says "something something source" and KEEP that line.
Your copy avs script should look like this.

Next you want to type "video =" at the beginning of the DGDcode line.
After that, go to the next line and type
audio = directshowsource("d:\momochi iv\VTS_01_1 Ta0 48K 16bit 2ch.wav")
NOTE: Obviously your file names and file paths will be different from mine. The audio line should look be the same as the video line except with your audio loaded. Look at the picture below if you are confused.

1. Where the red 1 is should be the letter of your hard drive. If you have a C: drive, then it should say C: It should be the same letter as the one in video =
2. "momochi iv" is the name of the folder I created for the Momoko DVD I'm using to encode. You should type the name of your folder where the red 2 is. Again, it should be the exact same as what it says in the video = line.
3. This should be the name of your audio. It might be a .wav file, it might be a .ac3 file, it might be an .mp3 file. Whatever the name of the file is, it should be typed there.
Okay that was confusing wasn't it? If you are still confused, I will attach a video at the end of this post of me doing all of the steps so hopefully it will be clear then.
Now that you have two lines, a "video =" line and an "audio =" line, go to the next line and type audiodub(video,audio)
and then on the next line type
showframenumber()
and save the file as "copy.avs" so you won't get confused.
The finished copy.avs file should look like this.

Now after you save it as "copy.avs", you can close it. Now you should just have vdub, the original .avs file, and the .clt file open and it should once again look like the 5th picture.
Next you want to open the copy.avs file in vdub. You can just drag it into vdub or do the file > open thing. If you did everything correctly, your video should appear in vdub like this.

The yellow zeros are what are called frames. Each 1/3rd of a second of the video has a specific frame. 0.333 seconds is frame 1, 0.666 is frame 2, etc. Every single video is made up of thousands of frames, and those frames come together to make up the video. Think of a flipbook.
Anyway, we are going to rely on frames (instead of time) in order to edit video more accurately.
In most cases you will want to start at frame 0, so in your .avs file and in your .clt file you'll want to add 0.
For the .clt file on the eighth line where it says <startFrame>0</startFrame>, you'll want to type 0 there (in my case, it already has a 0).
For the .avs file, make a new line at the end and type
trim(0,
both of your files should look like this.

What that says is that you want your video to start at frame 0 (which is 0 seconds). Of course, if you want your video to start at like the 4 minute mark, in vdub, find 4 minutes and type whatever frame number instead of 0.
Finally we will look for the ending point of our video. If you are encoding for Youtube, you should know that videos can be as long as 15 minutes, so you'll want to go to about the 15 minute mark, look for a good stopping point (for example, if you are in editing a concert, you don't want to stop in the middle of a song even if it is still going when the video hits the 15 minute mark) and type the frame number in the two files.
For the .clt file, type that number (in my case it's frame number 14617) in the 9th line where it says <endFrame>100</endFrame>
Change the "100" to whatever your frame number is.
For the .avs file, type the end frame number after the comma. For my video its: trim(0,14617).
They should look something like this.

Save the two files and close them. Put vdub in the background somewhere.
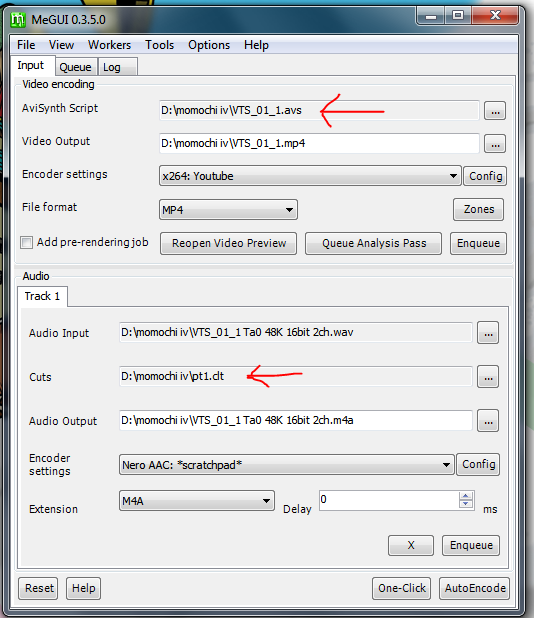
Now go back to MeGUI. The .avs file should already be loaded, but if it isn't, drag and drop it to where it says "Avisynth Script".
Also drag and drop the .clt file where it says "cuts".
MeGUI should look like this.
If it does, click enqueue on both the audio and video. If they both encode fine, pat yourself on the back, you did it!
But there is one last step. MeGUI encodes the audio and video separately so you'll need to combine the two into one file.
Back in MeGUI, click Tools, then Muxer. Now select the muxer or whatever file type you want your final video to be. If you want an .mp4 file, then select .mp4 muxer. Add the video and audio to their correct spots, hit queue and that's it.

After that is done, you'll have to redo the whole frame number thing for each part that you need to edit, but it gets much easier the second and third time around since you can reuse the same .clt file, .avs file, and copy.avs file for each part you need to edit.
Finally, as promised, here is the video of me doing all of the above steps (except for combining the video + audio, I think you can handle that). Watch on Youtube in 720p so that you can see everything clearly.
0 comments:
Post a Comment