


Something I've been wanting to do for a while now was build my own computer. Monday I finally was able to make that a reality. Everything went pretty smoothly and I am typing this post on my brand new PC.
If I could give just one piece of advice to first time builders, it would be to read everything. Yes, I know, common sense right? Still, there seems to be a touch first, ask questions later attitude when it comes to building things with most people. So read all of the instruction manuals and it will save yourself from a lot of headaches.
Now onto the build. Here is a look at some of the components used.

Moar components.

Total list of new components used:
- Intel Core i7 870 Quad Core Processor @ 2.93 GHz
- Gigabyte GA-H55-USB3 motherboard
- Corsair H50 Water Cooler
- OCZ Gold Series 4 GB RAM
- Cooler Master USP 100 ATX Mid Tower Case
- Cooler Master 550W power supply
- EVGA GeForce 210 video card
- Microsoft Wired Keyboard 600
- Western Digital 1.5 TB external Hard Drive
Total list of components taken from old PC:
- EVGA GeForce 8800 GTS video card
- Logitech LX7 wireless mouse
- Kensington SmartSockets power adapter
- Samsung SyncMaster 245BW 24" monitor
- Hitachi 500 GB internal hard drive x2
- DVD burner
- DVD ROM drive
The MVP of the bunch is definitely the Intel i7 870 processor. No surprises here. An i7 processor is about as good as you can buy right now. It's technically a quad core, but it actually has eight virtual cores, which really helps on things that I really care about - namely encoding. Awesome. I ordered a couple of case fans from Amazon, which should be here by the end of the week. After I install them, I'll try my hand at overclocking the i7 with 4.0 GHz being my ultimate goal. With the water cooling and the extra fans, I'm hoping that I can reach those levels, but I'm certainly not counting on it. I'd be more than happy to settle for a stable 3.8 GHz, which is a huge step up from my Q6600 quad core @ 2.4 GHz.
Anyway, back to the building process. Opening the Cooler Master box reveals a really epic looking mid tower case.

It's big difference visually (and functionally too) from the random HP case I used for three years.

Opening the case reveals emptiness (not like I expected anything different).

One thing you can't see (sorry for horrible pictures, I was overly excited and later tired upon working on my first build) is that Cooler Master already installed the power supply. That's one less thing that I have to do, so yay.
Unboxing the motherboard.

I had a hard time picking which motherboard to buy, but after a week of research, I decided on the above mentioned Gigabyte board and I have no complaints thus far.
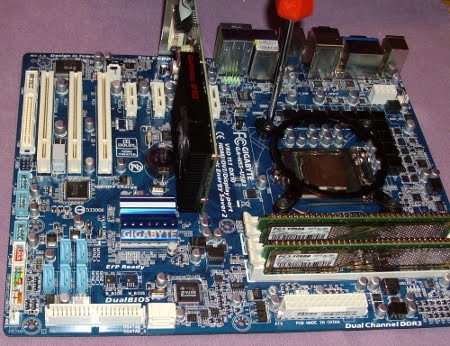
Fast forward and we have a nearly completed motherboard (processor, RAM, and video card added).
Fast forward a bit more and here is the inside of the case with the power supply, motherboard, and water cooler installed.

And here I have almost everything inside and connected.

The only things missing are my other Hitachi internal HD as well as both DVD drives. The case only came with 2 SATA cables and I had four things to connect (both internal hard drives and both DVD drives), so I decided to just jack two cables from my old PC. Unfortunately the cables were way too short (thanks HP) so I had to hold off on adding one of the HDs and one of the DVD drives.
Entering the home stretch, I finally had everything in the case and everything connected (or so I thought). All that was left was to plug everything in, push the power button, and pray it turns on.
So I pushed it and waited... and waited... and waited. Nothing. I didn't panic because I knew there was no way I'd get it 100% correct my first time so I unplugged the power supply and went into the case once again. Putting my first tip into action, I re-read the Gigabyte's motherboard manual when I realized I failed to connect a bunch of things, including the On button. Silly me.
So I connected the On button as well as some other random cable and tried to power it on a second time. Once again, nothing.
Back to the trusty manual I went and looked for other things to connect. I forgot to connect another power supply cable as well as the audio and another that I can't remember at the moment. Everything was finally connected so I tried to power it on a third time and yep, the third time's a charm.
Windows 7 booted up without any issues to my surprise. Remember I said that I have two Hitachi internal hard drives? They both are identical so it was by luck that I happened to grab the one with my old C: drive, containing my Win7 installation.
After a quick scare of thinking either something was wrong with the LAN on my new motherboard, I remembered that drivers needed to be installed (which Win7 did quite promptly) and I was able to access the internet after a reboot.
One of the first things that I did was open Windows Task Manager to confirm something for myself.

There is something really awesome about seeing eight cores.
The only real problem that I've encountered so far (and you can see it in the above screenshot if you look closely) is that Windows is only recognizing 2 GB of the total 4 GB of RAM I installed. After some research it could very well be the crappy video card I used that is stealing memory. After my two fans and SATA cables come later this week, I'll install my old one and see if anything changes. If not, I have a copy of Win7 64 bit laying around somewhere that I'll try dual booting with as a last resort.
So, 9 hours of build time and $700 later, was it worth it? Absolutely. There was definitely a point during the build where I wanted to give up (though I suppose working that long without any real break will do that to you), but there was no better feeling to my inner nerd self than hitting the power button and having the PC function properly.
Also, of course I had to start encoding right away on my new system (the Morning Musume Hawaii FC tour I uploaded last night was done using this new PC) and my i7 did not let me down. Normally a 15 minute Youtube clip would take me around 10-12 minutes to finish encoding. Yesterday, it only took 4-5 minutes. And that is before I start overclocking. Needless to say, I am a pleased nerd.
0 comments:
Post a Comment